Saturday, April 11, 2015

Making Flex Muscles with Flex Modifer in 3ds Max by Paul Neae

Flex Muscles 1


Tutorial showing a method for using Flex for muscles in 3DS Max


Flex Muscles 2, Fatty Tissue


Tutorial showing how to use Flex in 3DS Max for creating fatty tissues in characters


Flex Muscles 3 Rigging Muscles


Creating muscles in 3DS Max using Flex, Skin Wrap, Volume Select and Vertex Paint.

Custom Cat Rigs for Characters in 3DS Max


In this tutorial we are going to take a basic character and build a custom bone skeleton rig for him to get him ready for animation.

CAT Rig setup in 3ds Max


How to set up a 3ds Max CAT Rig to fit your character. CAT Rig is a quick and versatile way of animating characters in 3ds Max and setting up a quality rig is really easy.

SkinWrap in 3ds Max


Using 3ds Max SkinWrap modifier to control tight fitting clothing on a character. SkinWrap is a great way to take anything you've already skinned and make it move too. High poly character could be skinned to a skinned low poly version.

Skin Morph in 3ds Max


This is a video Ken Pitts puts together on how to use the Skin Morph modifier in 3ds Max to fix skinning problems. Skin Morph tools are not great for re-modelling joints so he shows you how to import morph targets which you can model using all the normal tools. Also where you can use Skin Morph to fix common skinning issues.

Jewellery Rendering in 3D Studio Max with Vray


In this video we go through the steps of creating nice looking macro jewellery renderings with 3D Studio Max & Vray.

Getting Started with Vray in 3ds Max


Learn about Vray in 3ds max with Grant Warwick

Noise Free Renders with Vray in 3ds Max


Some of the noise settings tutor goes through to setup cleaner renders.
Enjoy everyone!

Subsurface Scattering and IRAY render Tutorial in 3DsMax


In this video we are going to go through subsurface scattering settings using IRAY renderer to get realistic results when applying this material to a cg food scene.

Realistic Grass In 3D Studio Max 2015 & IRAY


Using the Mantissa Grass Gen Script and Iray to create realistic grass and rendering it out with Iray renderer.

Working with OpenSubdiv in 3ds Max 2015


In this video John Martini, known for his site Joker Martini, walks through the details of OpenSubdiv in 3ds Max.

Friday, January 29, 2010

Rig character for 3d Studio Max user

Rig character for max user


Recently I have made a character rig in 3d Studio Max - 9 for animation practice. It is a basic rig but very handy for animation practice. I made tow type rig one is FK hand and other is IK hand with stretchy bone. I like to share with all the max users who want to be animator.

Software - 3d Studio Max - 9

Here is the download link

Download

Friday, May 22, 2009

Human Leg Rigging system in 3ds Max

Leg Rigging with Bone system in 3d Studio Max

Here is a video tutorial of Leg Rigging with Bone in 3d Studio Max. Here i didn't use any 3d model. Here i just showed the system how to rig a leg of human character. Its an interesting leg rigging system. Usually I follow this system of leg rig in my character rigging.


Hope it will be helpful.

Wednesday, November 26, 2008

Reactor tutorial in 3ds Max

Reactor Tutorial:
Pulling a Box With Reactor Rope and Wheel


For real time animation Reactor is a great way to save time in 3D Studio Max.

This Reactor Tutorial is not an advanced level tutorial. This is tutorial of basic or may be intermediate level of 3d Max.

In this Pulling a Box With Reactor Rope and Wheel Tutorial, I have used reactor simulation for pulling a box with rope. Here you can know, how to create a rope for reactor simulation in 3D Studio Max, the use of rigid body, rope modifier, rope collection, constraint solver, point-point constraint and others for Reactor Simulation.


Thanks
Post your comments please.
Free Download from Tubosquid Free Download from 3d Studio

Wednesday, November 19, 2008

Some tips on Windows Problem

Many times we fall in problem with our computer for virus attack. I am not expert about computer. Once i faced some problem and one of my good wisher suggested me. I did as his suggestion and it works really well. I want to share it to all.

When you see the following error massages -

"Task Manager has been disabled by your administrator"
"Registry Editing has been disabled by your administrator"
"Registry Editing has been disabled by your administrator" .

To fix this kind of problem do the following -


1) Task Manager has been disabled by your administrator

Click Start, Run and type this command exactly as given below: (better - Copy and paste)

REG add HKCU\Software\Microsoft\Windows\CurrentVersion\Policies\System /v DisableTaskMgr /t REG_DWORD /d 0 /f

==========================================

2) Registry Editing has been disabled by your administrator

REG add HKCU\Software\Microsoft\Windows\CurrentVersion\Policies\System /v DisableRegistryTools /t REG_DWORD /d 0 /f

==========================================

3) The command prompt has been disabled by your administrator

REG add HKCU\Software\Policies\Microsoft\Windows\System /v DisableCMD /t REG_DWORD /d 0 /f

I think it is helpful.

Saturday, May 17, 2008

Cartoon Character Body Modeling Tutorial in 3ds max, Part-2 by khalidur3d

In this part we will add Shoe, Hand and Head to the body part.
Hide
To make a simple Cartoon Shaped Shoe in 3d Studio Max, first of all create a box with the following segments-
Length- 2 , Width - 4 , Height - 2.


Convert it to Editable Poly and adjust the position of the vertices of the Box like below so that it look likes a Shoe.

With the Extrude, Hold down Shift and move etc. make the shoe looks like below.
I don’t want to describe it briefly, i think you can do that now.
After finishing Shoe modeling Unhide the Body. Place the shoe where should be … Select the Body part Click on ‘Attach’ button and then click on the Shoe.
Now Shoe will be attached to Body and they will be only one object together.
Now we will make the belt of the body.
In the Modifier Panel click on the bulb, left side of the Symmetry to Turn Off it.
So, select the Edges where we want to make belt and Chamfer them.
Select the newly created Polygons and Extrude them little bit two times like below. Make sure it is ‘Local Normal’ in the Extrusion Type.

Delete the polygons.

Now turn off Polygon mode. Be sure in the modify panel “Editable Poly” is selected. Right click any where in the viewport and choose “NURMS Toggle”. Look that the model looks like smooth.

Now we will make Hand.
To make or model a Human Hand in 3d Studio Max i always prefere to start from finger.
Here i also do the same. So let’s start Modeling of Hand. For that Create a Box in the Top Veiw with segments of Length- 1, Width - 1, Height - 5
Convert the box to Editable Poly. Go to Vertex mode.
Arrange the Vertices like below

Select the two Edge loops and with the Chamfer tool add new Edges like below.

Select the polygon wherefrom the finger is started. Extrude it and then delete the poly.


Go to Element mode, and select the finger. Hold down Shift key and move it to copy. a dialog box will open. press ok.
Arrange them like below.
Now select the four Borders like below. Right click anywhere and choose Convert to Vertex.
Notice the change.
Now click on Weld Option box beside the Weld button. A dialog box called “Weld Vertices” will open. Increase the value of Weld Threshold untill the Vertices are Weld.

Select the Edges like below, hold down Shift key and move to X axis.

Do the same 2 times more.
Select the poly and delete it.

To make Thumb finger Select the polygons of the finger like below and copy it with Shift key + move.

With move and rotate tool place it in thumb finger’s place.

Activage the Target Weld button. First click on a Vertex of the Thumb and then click on Vertex of the hand. In the Picture below it has been shown with the Dot arrow line.

After some adjustment of the vertex of the hand it should be looked like this.

Right click and select NURMS Toggle to turn on and see the Smoot hand.


Now we will Attach it to the Body .
So turn off NURMS Toggle. Select the body. Go to Modify Panel, Click on Attach button and click on Hand.
The Hand will be attached with body.
Now select the two borders.
Connect this two borders with Bridge tool.

Remove the selected Edge as shown below.

Select the two Verteces and right click any where in the viewport and choose Connect. A new Edge will be created. Do the same behind the Hand.


After Attachment Turn on Nurms Toggle and Turn on Symmetry.
Hurrah ! we have made a Cartoon Character. Have fun !


In my next Tutorial I will describe about making of Shirt, Coat etc and Texturing.
Cartoon Character Body Modeling Tutorial, Part-1 by khalidur3d
Cartoon Character Body Modeling Tutorial, Part- 2 by khalidur3d

Comming

Cartoon Character Body Modeling Tutorial in 3ds max, Part-1 by khalidur3d

Cartoon Character Body Modeling Tutorial by Khalidur3d
Part-1


Hello every body,In my previous blog i described how to model a simple Cartoon Character Head in 3d Studio Max.
Ok lets start……..
First Make a Cylinder with the following segments any where in the viewpot.
Height - 5, Cap - 1, Side - 8.
Then in tool bar right click on the Move Button. A new dialog box will open. In the Absolute World area set the value of X and Y to ‘0′ so that it stands in the middle of the the grid. It helps us in modeling such as when we use symmetry modifier.
[ tips- right click on the spinner arrow button, right side of the value, set value 0 automatically].
Then move the Cylinder upward like below.

Right click on the viewport. A quad menu will be appear. Select Convert To > Convert to Editable Poly.

Now go to Modify panel and to go to Vertex mode. Make the shape of the Cylinder like below with the Move and Scale tools.

Extrude the upper Polygon.


Then scale down the Polygon to make the neck of the body like below.


To make the neck of the body again extrude the poly for two times.

Go to vertex mode and select the upper vertices and adjust them to your reference with Move and Scale tools.

Now go to Edge mode select the Edges as shown below. In the modify panel go to Edit Edges Roll out , and click on the box beside the Connect button. Here we will make new Edges with Connect tool.


A new dialog box named ‘Connect Edges’ will open. Set the segments value to 2 and then press OK.

Look that newly created Edges below.


Again go to Vertex mode and the vertices like below so that it makes the shape like your reference.


Now we will delete one side of our model and use Symmetry modifier. So in the front view port select the Vertices of the left side of the model like below.

Then press Delete button in your keyboard.

Now we will make the hand of our model. For that select the polygons as shown below and delete them.
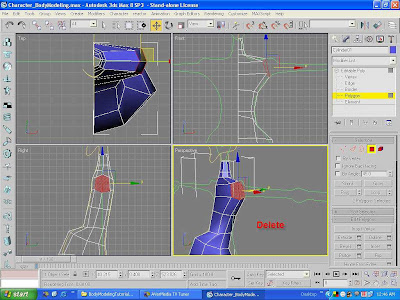

Go to modify panel and select Border. Then select the border where from we will make hand.


Activate the front viewport. Hold down Shift key and move the selected Border to make hand.


Activate the left viewport and click on View Align button in the modify panel and look the change of the border.


Scale down the Border as reference.

Now go to Edge mode select the Edges as shown below. In the modify panel go to Edit Edges Roll out , and click on the box beside the Connect button. Make sure the Segments value is 1 and click OK.

Again activate the left viewport and click on View Align button in the modify panel and look the change of the newly created Edges.


In the Front Viewport move the Edges toward the Chest.
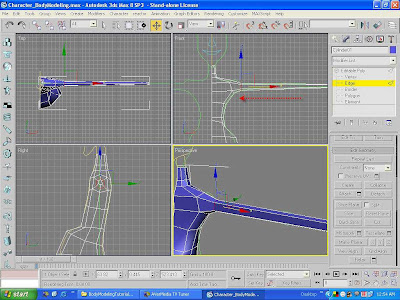

Make the Edges with Connect tool and change the shape of the newly created Edges with move and scale tools like below.


With the Connect tool make the Edges with Segment value - 5 as shown below.

Make the shape of the Upper arm and forearm.

With Connect tool Make new Edges.


Select the two Edges as below. Right click on the viewport and click on Connect.


Now we will learn the tool “Bridge”. So select the lower two Edges as below-


And click on the button ‘Bridge’ in Modify panel. The selected two edges will be connected with a new polygon.

Now select the Border and click on ‘Cap’ button in Modify Panel. It fills up the hole with a new polygon.

Now select the the two polygons like below and click on the little box beside the Extrude button.


Click on Apply 2 times and click on Ok button.


Now make the the shape of it like below delete the polygons like below.


Now select the two Edges like below. Right click and choose Connect.


Now we will make the leg of our model.

So, Extrude the the select polygon as below as long the leg.


With Connect tool create new Edges like below.


Reshape it as leg or as your reference.


Now we will apply Symmetry modifier to make the other side of the body.

So, go to modify panel and open the modifier list and select ‘Symmetry’.


As a result notice that the other part of the body.


In the next part we will add Legs and Hands and attached them to the body also the Head which we make in our previous Tutorial.

Cartoon Character Body Modeling Tutorial, Part-1 by khalidur3d
Cartoon Character Body Modeling Tutorial, Part- 2 by khalidur3d

Visit The3dStudio.com

Search More