
Cartoon Character Body Modeling Tutorial by Khalidur3d
Part-1

Hello every body,In my previous blog i described how to model a simple Cartoon Character Head in 3d Studio Max.

 Extrude the upper Polygon.
 Then scale down the Polygon to make the neck of the body like below.
 To make the neck of the body again extrude the poly for two times.
 Go to vertex mode and select the upper vertices and adjust them to your reference with Move and Scale tools.
 Now go to Edge mode select the Edges as shown below. In the modify panel go to Edit Edges Roll out , and click on the box beside the Connect button. Here we will make new Edges with Connect tool.
 A new dialog box named ‘Connect Edges’ will open. Set the segments value to 2 and then press OK.
Look that newly created Edges below.
 Again go to Vertex mode and the vertices like below so that it makes the shape like your reference.
 Now we will delete one side of our model and use Symmetry modifier. So in the front view port select the Vertices of the left side of the model like below.
 Then press Delete button in your keyboard.
 Now we will make the hand of our model. For that select the polygons as shown below and delete them.
 Go to modify panel and select Border. Then select the border where from we will make hand.
 Activate the front viewport. Hold down Shift key and move the selected Border to make hand.
 Activate the left viewport and click on View Align button in the modify panel and look the change of the border.
 Scale down the Border as reference.
Now go to Edge mode select the Edges as shown below. In the modify panel go to Edit Edges Roll out , and click on the box beside the Connect button. Make sure the Segments value is 1 and click OK.
 Again activate the left viewport and click on View Align button in the modify panel and look the change of the newly created Edges.
 In the Front Viewport move the Edges toward the Chest.
 Make the Edges with Connect tool and change the shape of the newly created Edges with move and scale tools like below.
 With the Connect tool make the Edges with Segment value - 5 as shown below.
 Make the shape of the Upper arm and forearm.
 With Connect tool Make new Edges.
 Select the two Edges as below. Right click on the viewport and click on Connect.
 Now we will learn the tool “Bridge”. So select the lower two Edges as below-
 And click on the button ‘Bridge’ in Modify panel. The selected two edges will be connected with a new polygon.
 Now select the Border and click on ‘Cap’ button in Modify Panel. It fills up the hole with a new polygon.
 Now select the the two polygons like below and click on the little box beside the Extrude button.
 Click on Apply 2 times and click on Ok button.
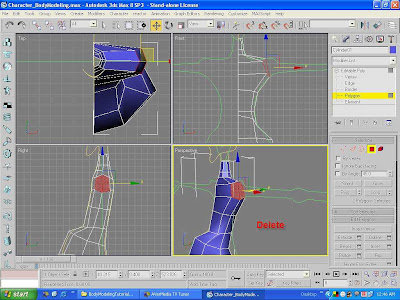
 Now make the the shape of it like below delete the polygons like below.
 Now select the two Edges like below. Right click and choose Connect.
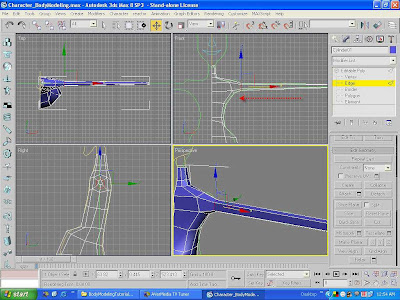
 Now we will make the leg of our model.
So, Extrude the the select polygon as below as long the leg.

With Connect tool create new Edges like below.
 Reshape it as leg or as your reference.
 Now we will apply Symmetry modifier to make the other side of the body.
So, go to modify panel and open the modifier list and select ‘Symmetry’.
 As a result notice that the other part of the body.

In the next part we will add Legs and Hands and attached them to the body also the Head which we make in our previous Tutorial.
Cartoon Character Body Modeling Tutorial, Part-1 by khalidur3d
Cartoon Character Body Modeling Tutorial, Part- 2 by khalidur3d
Part-1

Hello every body,In my previous blog i described how to model a simple Cartoon Character Head in 3d Studio Max.
Now i shall describe Cartoon Character Body Modeling Tutorial .
Ok lets start……..
First Make a Cylinder with the following segments any where in the viewpot.
Height - 5, Cap - 1, Side - 8.
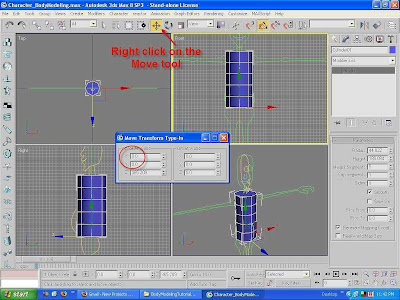
Then in tool bar right click on the Move Button. A new dialog box will open. In the Absolute World area set the value of X and Y to ‘0′ so that it stands in the middle of the the grid. It helps us in modeling such as when we use symmetry modifier.
[ tips- right click on the spinner arrow button, right side of the value, set value 0 automatically].
Then move the Cylinder upward like below.

Right click on the viewport. A quad menu will be appear. Select Convert To > Convert to Editable Poly.

Now go to Modify panel and to go to Vertex mode. Make the shape of the Cylinder like below with the Move and Scale tools.
 Extrude the upper Polygon.
 Then scale down the Polygon to make the neck of the body like below.
 To make the neck of the body again extrude the poly for two times.
 Go to vertex mode and select the upper vertices and adjust them to your reference with Move and Scale tools.
 Now go to Edge mode select the Edges as shown below. In the modify panel go to Edit Edges Roll out , and click on the box beside the Connect button. Here we will make new Edges with Connect tool.
 A new dialog box named ‘Connect Edges’ will open. Set the segments value to 2 and then press OK.
Look that newly created Edges below.
 Again go to Vertex mode and the vertices like below so that it makes the shape like your reference.
 Now we will delete one side of our model and use Symmetry modifier. So in the front view port select the Vertices of the left side of the model like below.
 Then press Delete button in your keyboard.
 Now we will make the hand of our model. For that select the polygons as shown below and delete them.
 Go to modify panel and select Border. Then select the border where from we will make hand.
 Activate the front viewport. Hold down Shift key and move the selected Border to make hand.
 Activate the left viewport and click on View Align button in the modify panel and look the change of the border.
 Scale down the Border as reference.
Now go to Edge mode select the Edges as shown below. In the modify panel go to Edit Edges Roll out , and click on the box beside the Connect button. Make sure the Segments value is 1 and click OK.
 Again activate the left viewport and click on View Align button in the modify panel and look the change of the newly created Edges.
 In the Front Viewport move the Edges toward the Chest.
 Make the Edges with Connect tool and change the shape of the newly created Edges with move and scale tools like below.
 With the Connect tool make the Edges with Segment value - 5 as shown below.
 Make the shape of the Upper arm and forearm.
 With Connect tool Make new Edges.
 Select the two Edges as below. Right click on the viewport and click on Connect.
 Now we will learn the tool “Bridge”. So select the lower two Edges as below-
 And click on the button ‘Bridge’ in Modify panel. The selected two edges will be connected with a new polygon.
 Now select the Border and click on ‘Cap’ button in Modify Panel. It fills up the hole with a new polygon.
 Now select the the two polygons like below and click on the little box beside the Extrude button.
 Click on Apply 2 times and click on Ok button.
 Now make the the shape of it like below delete the polygons like below.
 Now select the two Edges like below. Right click and choose Connect.
 Now we will make the leg of our model.
So, Extrude the the select polygon as below as long the leg.

With Connect tool create new Edges like below.
 Reshape it as leg or as your reference.
 Now we will apply Symmetry modifier to make the other side of the body.
So, go to modify panel and open the modifier list and select ‘Symmetry’.
 As a result notice that the other part of the body.
In the next part we will add Legs and Hands and attached them to the body also the Head which we make in our previous Tutorial.
Cartoon Character Body Modeling Tutorial, Part-1 by khalidur3d
Cartoon Character Body Modeling Tutorial, Part- 2 by khalidur3d

No comments:
Post a Comment